Kudanが提供するKudanSLAMに代表されるSLAM (Simultaneous Localisation and Mapping)技術のためのカメラキャリブレーションについて概説します。
前回の記事:
SLAMのためのカメラキャリブレーション(1/3)
Approaches and tips for calibration
The quality of the calibration has important consequences on the quality of SLAM or other vision algorithms, so we present some basic approaches and tips for correct calibrations.
Selecting the chessboard
Calibration depends on the properties of the known calibration object. While other objects are possible, we use and recommend calibration via chessboard plate. Calibration software detects internal corners of the chessboard patterns, and then uses their detected position to calibrate the camera by assuming the following facts:
●The calibration plate is perfectly flat.
●The internal corners form a regular grid, that is the points in a row or column are straight and evenly spaced.
It’s thus important that our calibration plate is as flat as possible, and that the print quality is high: smudged corners or non-regular aspect ratios will introduce errors in the calibration. It is also important than the print is high contrast and preferably not reflective, to facilitate the corner-detection component of the software. It’s also important to have some white border around the print, in order to minimise mis-detection of the internal corners.
The size and number of squares depends on the camera rig that has to be calibrated:
●A bigger board is best suited for short focal length lenses when calibrating intrinsics and for wider stereo baselines when calibrating extrinsics.
●A smaller board is best suited for long focal length lenses when calibrating intrinsics and for shorter stereo baselines when calibrating extrinsics.
●For a given size, smaller chessboard squares, that is more dense internal corners improve accuracy but are more difficult to detect correctly.
●For a given size, bigger chessboard squares, that is more sparse internal corners are easier to detect but might result in less accurate calibration.
For practical purposes, at Kudan we use three chessboard sizes depending on the rig, there is overlap between the usability of different chessboard sizes, it is not an hard threshold.
Big chessboard size [pdf]:
●Print size: A2
●Overall board size: 500 x 674 mm
●Number of squares: 22 x 15
●Number of internal corners: 21 x 14
●Square size: 25.5 mm
●We tend to use this size when the lens and sensor combination results in an horizontal field of view of 80° or more, and/or when our stereo baseline is over 20 cm
Medium chessboard size [pdf]:
●Print size: A3
●Overall board size: 377 x 500 mm
●Number of squares: 16 x 11
●Number of internal corners: 15 x 10
●Square size: 25.5 mm
●We tend to use this size when the lens and sensor combination results in an horizontal field of view between 70° or and 100°, and/or when our stereo baseline is between 10 cm and 40 cm
Small chessboard size [pdf]:
●Print size: A4
●Overall board size: 290 x 377 mm
●Number of squares: 16 x 11
●Number of internal corners: 15 x 10
●Square size: 18.0 mm
●We tend to use this size when the lens and sensor combination results in an horizontal field of view of 80° or less, and/or when our stereo baseline is under 30 cm
Calibrating camera intrinsics
When calibrating a camera, other than basic care in things like using proper exposure and focus settings, there are two aspects specific to camera intrinsics that we want to take into consideration:
●Coverage of the field of view
●Presence of some parallax in the views
The first image we take tries to encompass as much as possible of the internal chessboard corners in the view:

This helps getting overall coverage of the field of view.
After taking the central view, we want to make sure we cover all the sides and we want to introduce parallax, so for each image side we take an image that has the internal chessboard corners as close as possible to the side and slant the chessboard away from the center of the image:
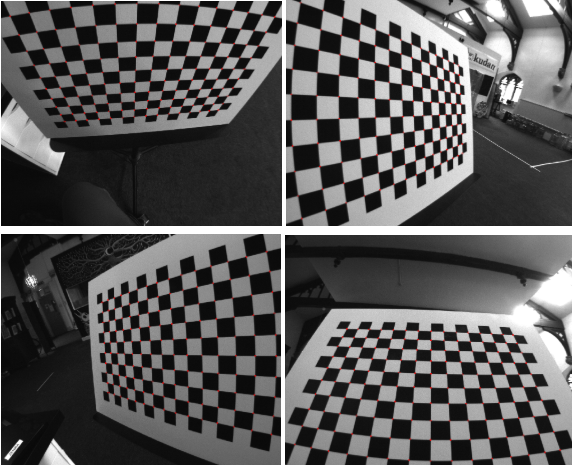
The angle of the chessboard doesn’t need to be extreme for this.
The same approach can be repeated for the corners of the image to ensure a thorough coverage of the image and of parallax angles:
Like before, for each image corner it’s preferable to put the corresponding internal chessboard corner as close as possible to it and then slant the chessboard away from there, again there is no need for extreme angles.
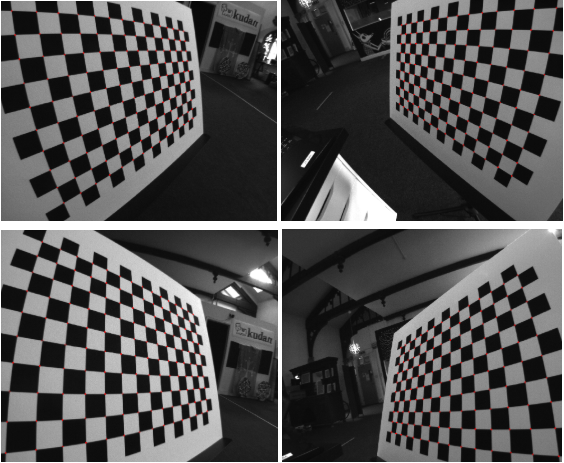
Once those basic views are covered, it is possible to take more pictures if desired, but care should be taken in not replicating the same view more than once to not influence negatively the quality estimation of the calibration procedure. When calibrating stereo rigs, the images captured during the extrinsics calibration can be also used for intrinsics as a source of additional information.
Adding more diverse views increases accuracy, but also increases computation time and the probability of an internal chessboard corner to not be properly detected. Care should be taken in checking that those corners (red in the pictures) are detected properly because otherwise calibration can fail.
Intrinsics calibration routines usually provide average RMS error estimate for the results. In general, lower numbers are better, and having an average error of more than one pixel is a sign that something went wrong. Usually the cause of wrongness is in some mis-detection of internal chessboard corners.