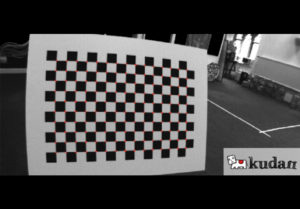
Figure 1: Calibration Chess Board
The process of determining the camera’s intrinsic and extrinsic properties can be defined as camera calibration [1].
In our last week’s article, we covered why calibration is important for Visual SLAM and the overall approach that needs to be followed.
Last week’s article was just an introduction so we want to go further in-depth about the process of camera calibration and present it to you today.
This article will essentially decode each of the steps we established already, on selecting the known object, the requirements for a good calibration sequence, and the steps you need to follow to calibrate the intrinsic and the extrinsic parameters.
How to select and use the known object
One of the first and foremost requirements for calibration is a known object.
There is no hard and fast rule on what this object should be, but based on our experience we know that chessboard with known dimensions is the most straightforward option.
Calibration software first detects the internal corners of the chessboard patterns and then uses their detected position to calibrate the camera [2] by assuming the following:
- The calibration plate is perfectly flat.
- The internal corners form a regular grid, so the points in a row or column are straight and evenly spaced.
Hence there are certain things you need to keep in mind about the chosen chessboard:
- The calibration plate is as flat as possible with high print quality: smudged corners or non-regular aspect ratios will introduce errors in the calibration.
- The print is high contrast and preferably not reflective, to facilitate the corner-detection component of the software.
- The presence of a white border around the print, in order to minimize misdetection of the internal corners.
Next, the preferred size of the chessboard depends on the camera rig and the parameters that need to be calibrated:
- A bigger board is best suited for short focal length lenses when calibrating intrinsics and for wider stereo baselines when calibrating extrinsic.
- A smaller board is best suited for long focal length lenses when calibrating intrinsics and for shorter stereo baselines when calibrating extrinsic.
Finally, for a given size of a chessboard, there are tradeoffs of having different sizes of chessboard squares.
For instance, smaller chessboard squares with more dense internal corners, result in improved accuracy but are harder to be detected correctly. Conversely, larger squares with sparse internal corners are comparatively straightforward to detect yet yield lower calibration accuracy.
At Kudan, we’ve settled for three different sizes of the chessboards based on the camera rigs, and more on each’s features and usage can be found below:
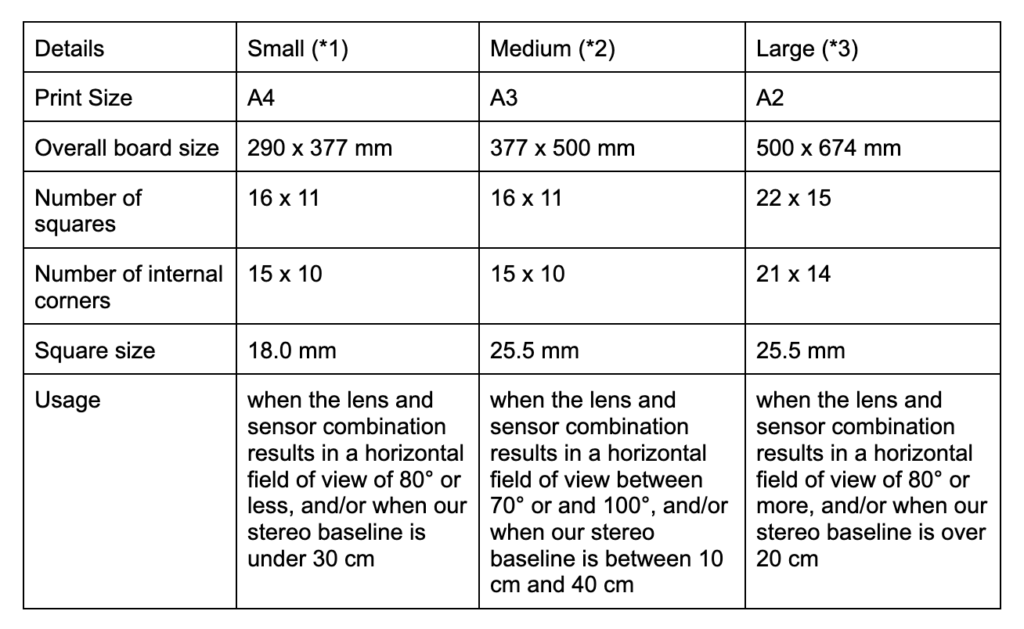
Table 1: Specifications of the 3 chessboards
*1 Small: https://drive.google.com/file/d/1fcsraqrot1rn4IwmLMd4IjUzZmOzFVkB/view
*2 Medium: https://drive.google.com/file/d/1SAsUdXhItF9wNCTMunVo-56vTBc6wzHu/view
*3 Large: https://drive.google.com/file/d/1Db20YFSUUtIl6RdIHmgj8mKwwusNH21F/view
Though we recommend using normal chessboard for simplicity, you’d want to know there exists other calibration boards, should your use case demands it.
- AprilTags: It is a chessboard with AprilTag information in some of the internal squares. It carries information about a different tag in every other row or column. The advantage is that partial views of the chessboard can be captured and used, without any confusion in the calibration process. While it improves the reliability of the calibration process, there is no improvement in the overall accuracy of the resulting calibration.

Figure 2: AprilTag Board for Camera Calibration
- Dot-grid Board: It is a regular board with dots marked in a grid-like fashion, at known distances from each other. The dots are scanned and their center points are computed when using this board, instead of scanning the internal corner points of a normal chessboard. While using the dot-grid board, even if your camera resolution is low, accurate calibration can be obtained.
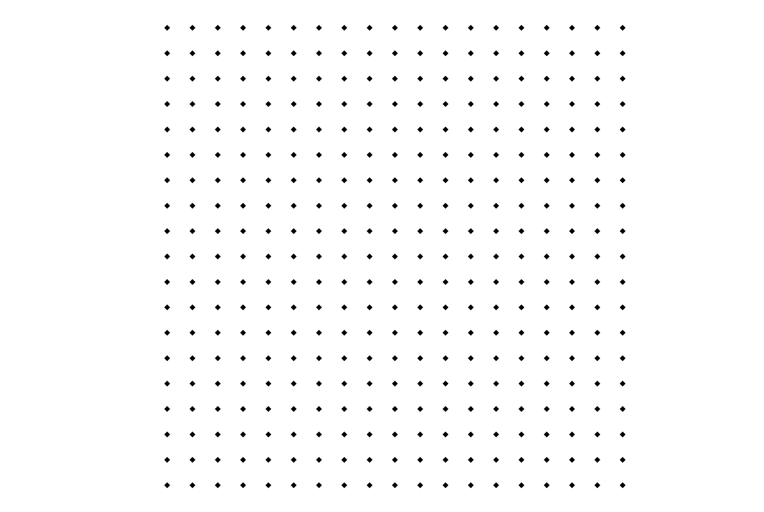
Figure 3: Dot-grid Board for Camera Calibration
Calibrating the intrinsic properties
We need to move the objects and take images, and let the software do its work. While doing so, pay attention to these two more things when you’re calibrating the intrinsic properties:
1. Coverage of the field of view
The first image we take needs to encompass the internal corners of the chessboard, as much as possible. This enables us to get the overall coverage of the field of view.
A sample image is given below:
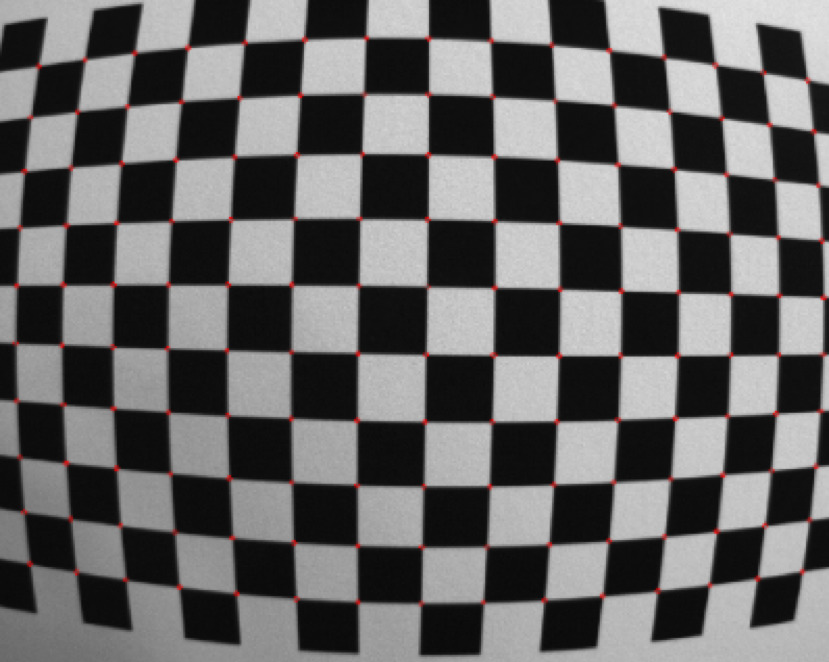
Figure 4: Image of chessboard encompassing internal corners of the chessboard
2. Presence of some parallax in the views
Next, we want to ensure all sides of the chessboard are covered while introducing parallax. Take images with internal corners of the chessboard closer to each side of the image, and slant the chessboard away from the center of the image.
Here are some sample images clicked for you, to make it more clear:
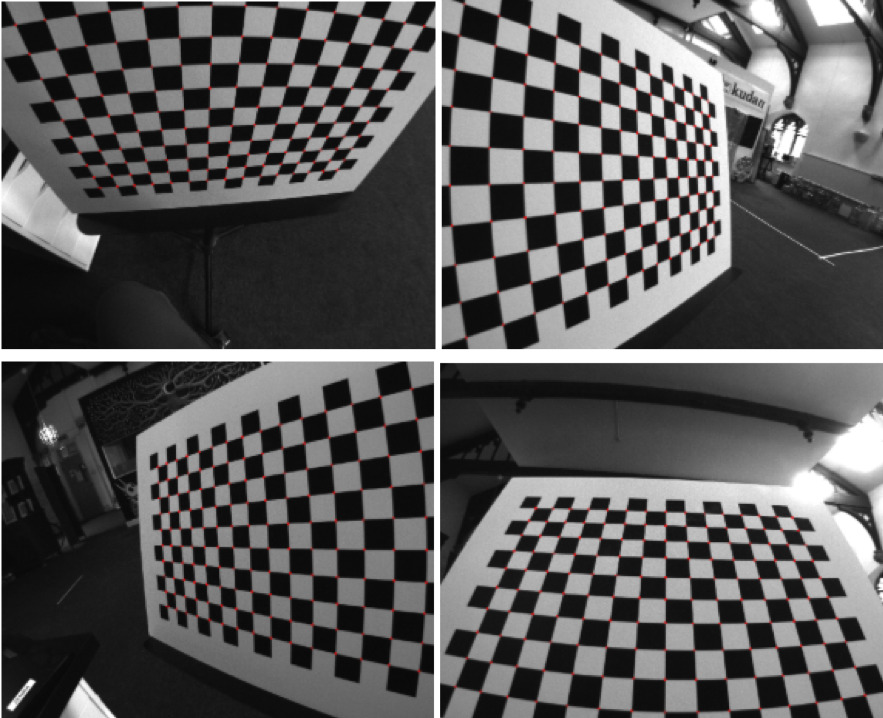
Figure 5: 4 images with internal corners of the slanted chessboard closer to each side of the image
Now follow the same steps, keeping the internal corners of the chessboard as close as to the corners of the image, and slanting the chessboard away from the image.

Figure 6: 4 images with internal corners of the slanted chessboard closer to each corner of the image
Ensure that the corners in the chessboard (depicted using red in the pictures) are detected properly, to avoid a failure in calibration.
You’re free to take more pictures if desired, and even use the images captured for extrinsic calibration as a source of additional information, however, keep in mind not to replicate the same view more than once, as it could negatively influence the quality estimation of the calibration procedure.
Diverse views improve the accuracy while increasing the computation time. It also increases the probability of an internal chessboard corner not being detected.
A common pitfall in intrinsic calibration is the misdetection of the internal corners of the chessboard. If you keep having this sort of issues, we recommend using an apritag-based calibration board.
In general, lower average root mean square (RMS) values are better. Results of an average error of more than one pixel indicate that something went wrong during the calibration process.
Calibrating the extrinsic properties
In our first article, we established that extrinsic properties also need to be calibrated, for stereo cases where more than one camera is involved.
Similar to the intrinsic calibration, coverage of the field of view and introduction of parallax in the images are vital for extrinsic calibration as well. However, we can’t cover usually cover the left part of the left image, along with the right part of the right image because of the view disparity. In addition, the images from each camera have to be captured at the same time.
So keep the chessboard as close as possible while being seen from both views and cover different vertical offsets as shown in the images below:
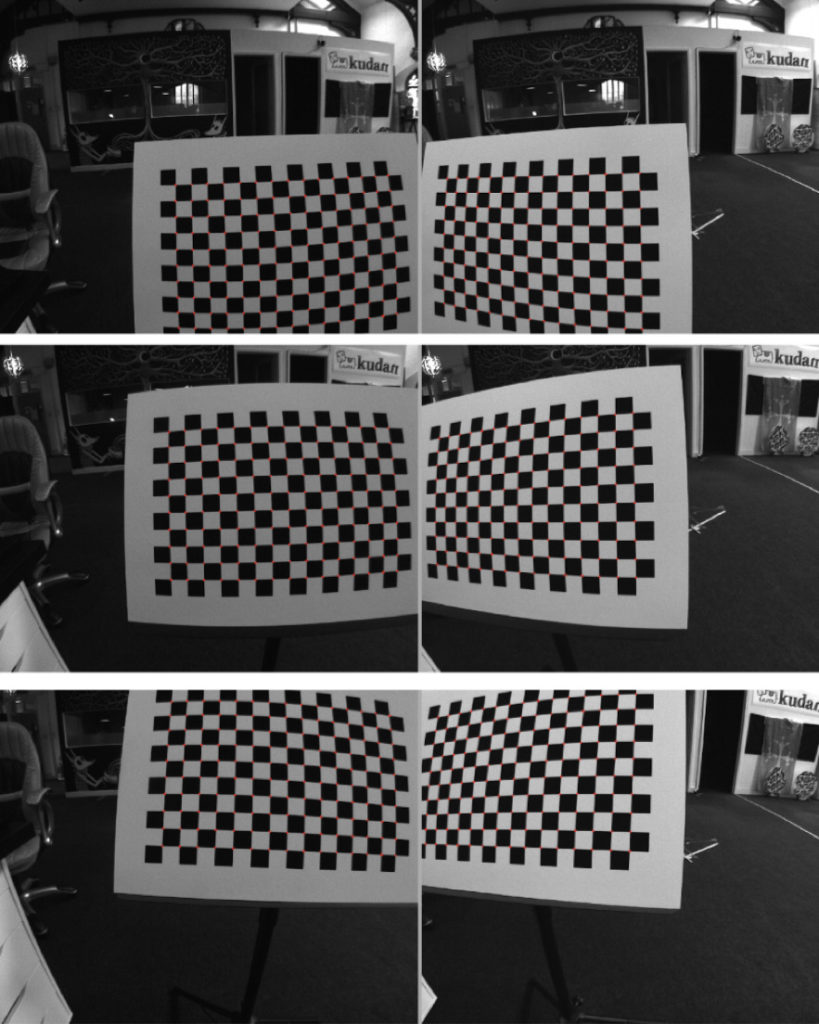
Figure 7: Image pairs for extrinsic calibration for covering the field of view
Now, let’s introduce parallax by slanting the sides of the chessboard as shown in the images below. However, extreme slant angles should be avoided since they can negatively impact the detection of the internal corners of the chessboard.
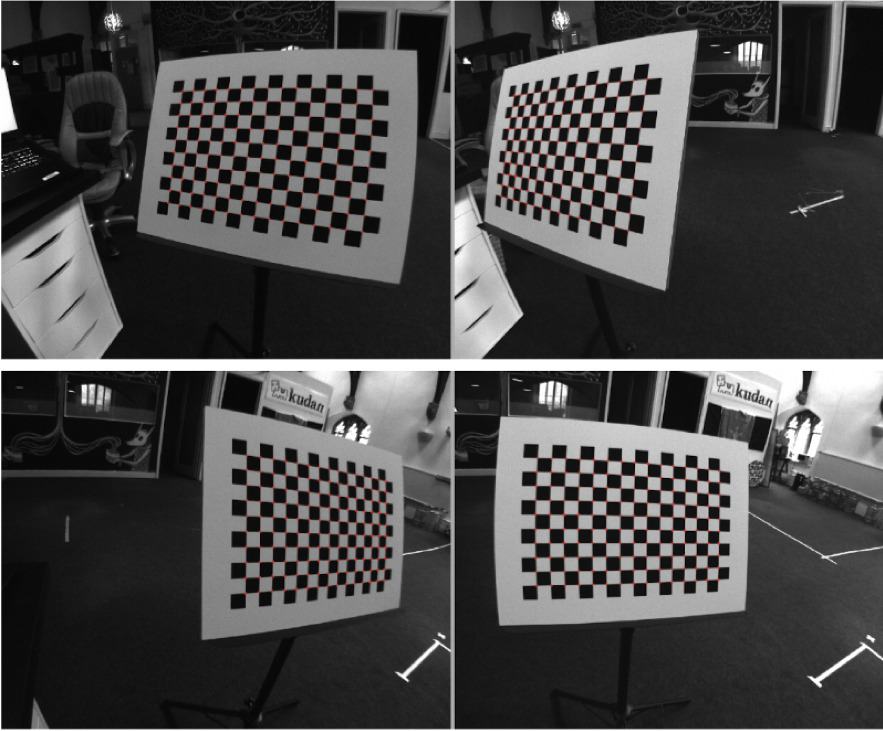
Figure 8: Image pairs for extrinsic calibration while introducing parallax
The same rules of thumb apply to extrinsic detection as well: diverse views increase accuracy, while also increasing the computation time and the probability of corners misdetection, hence avoiding taking similar image pairs more than once.
It’s important to notice that In practice if you have an extrinsic RMS error close to one pixel or more, it’s a sign something went wrong in the calibration.
In an ideal scenario, extrinsic RMS errors are minimum, and they denote the average vertical offset of a feature point between the left and right camera after applying the rectification and undistortion. If your calibration steps result in an extrinsic RMS error close to one pixel or more, most probably something in the calibration went wrong.
A real-time stereo algorithm like SLAM extensively relies on the vertical offset to not be more than a fraction of a pixel, else computation of map depth points is compromised.
To sum up, the following points are important to keep in mind when you record a sequence for calibration:
- The calibration sequence must include images of the chessboard over 9 quadrants of the camera straight on, and 8 images of the chessboard tilted with the center at the same distance from the camera (from the top, bottom, left, right, and halfway in between each)
- The chessboard should be parallel with the camera frame for all straight-on images.
- The chessboard should be completely visible in the camera image (both left and right images for stereo camera case)
- The chessboard should be as close to the edge of the camera frame as possible when recording all images except when the chessboard is centered in the frame (i.e. top, bottom, left, right, and 4 corners).
- Record the images with the distance from the camera similar to the intended use case (i.e. if the distance in the use cases is ~1m away from the camera, the calibration images are better to be recorded with a 1m distance from the camera)
- Avoid shades on the chessboard throughout the sequence
Final words
In the first article of the series, we introduced the camera properties and understand the 4-step calibration process using software libraries, how we should prepare for the calibration, and some post-calibration considerations.
In this second article of the series, we dived in-depth on which exact steps you should follow when it comes to selecting the object, and during the intrinsic and extrinsic calibration.
We hope that following these steps you’re able to complete the calibration of your cameras successfully. If you’ve got more questions on your specific use cases, we’re always happy to help you not just in getting started but also throughout your SLAM journey.
References
[1] Qi, Wang & Li, Fu & Zhenzhong, Liu. (2010). Review on Camera Calibration. 3354–3358. 10.1109/CCDC.2010.5498574. [PDF]
[2] Ntouskos, Valsamis & Kalisperakis, Ilias & Karras, George. (2007). Automatic calibration of digital cameras using planar chessboard patterns. Optical 3-D Measurement Techniques VIII. [PDF].
■For more details, please contact us from here.